Hi, I'm Meagan. Welcome to Style-Edition!  I am a style enthusiast. I love exploring creativity through decor and fashion and this is where I share my musings, inspiration, and projects.

Thanks for stopping by!

I welcome your feedback and suggestions at meaganmari[at]gmail.com

What do you want to see?

Entries in Projects (11)

Wednesday
Dec212011

Holiday How To: Salt Dough Ornaments & Gift Tags

This winter I decided to revive a holiday project that I did as a kid:  salt dough ornaments.  Not only is this a super simple project, it uses items you already have in your kitchen (double easy). I made a bunch of these to use as gift tags, but with a hook, they will easily translate to the tree.

The recipe is simple:

Salt Dough Ornaments

  • ½ cup salt
  • 1 cup flour
  • ½ cup water

1.  Pre-heat the oven to 250

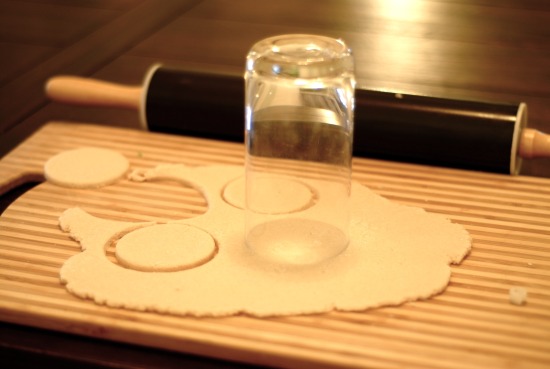
2.  Use a rolling pin to roll out the dough to ~1/4 inch thick.    Cut out shapes with cookie cutters (just like sugar cookies)  I used a glass to get simple circles.

Optional: Use a stamp to imprint a 3-d message or image onto the ornaments.

4. Use a drinking straw to poke a  hole for a ribbon or ornament hook.

 5. Place on a parchment lined baking sheet. Bake for 1.5 hours.

Optional: Paint.  I used a wash of green acrylic paint to give the gift tags I made a bit of color.  In the past I've also spray painted them and modge-podged them for a shinier affect.

Let me know if you have questions! 


Sunday
Dec112011

Holiday How To: T-Shirt Pom Pom Ornaments

Each year I like to make ornaments to add to my tree and I wanted to share a quick and easy project with you guys that you can make using old t-shirts: 

1.  Starting with on old t-shirt (or in this case a tank top) cut and rip 1/4 to 1/2 inch wide strips. 

2.  Once you've ripped the shirt into a pile of knit strips, you're ready to make them into a pom. It's OK if the t-shirt strips are varying lengths and widths.

3.  Wrap the strips around your a piece of cardboard slightly bigger than the width of the pom-pom you want.  When you hit the end of a strip, just layer the second strip over the end and keep wrapping around.

4. Once you have layered on the strips of t-shirts, pull the ball off the cardboard and tie an additional strip tightly around the center with a double knot.

5. Squeeze the scissors into the layers of t-shirt strips and cut them in half.  

6.  Now,  you should have a slightly lumpy looking pom-pom.  From here, fluff up the edges and then trim it into the an even shape.

Finally, tie it onto an ornament hook or present and you've got a festive handmade holiday decoration!  

Tuesday
Nov152011

Tom Binns Inspired Nail-Polish & Rhinestone Necklace DiY

This is one of the simplest projects ever, but I had to share.   Here's the inspiration:

I just love Tom Binns' neon rhinestone creations, but can't quite afford the hefty price tags ($400 and up!). So, I picked up a few vintage rhinestone necklaces to re-create the look.  

Like I said, the project is super easy:  I just pulled out some of my favorite nail-polish shades and painted over the rhinestones in a pattern that I liked. It might seem hard to avoid the little metal pieces that hold the stones in, but if you take a look at the Tom Binns versions, they're actually painted over, too. So, I didn't worry about it.

Here is a snapshot of me wearing it last week: Debuting my colorful DiY necklace

I actually have a couple of rhinestone necklaces that I was going to layer on top of each other to get a more impactful look, but I was happy with the single necklace for now. (We'll see how I'm feeling next week)

Friday
Apr222011

Earth Day Project

Painting a globe like this has been on my list since I saw these on Daily Candy last year.  How easy would it be?  Just pull out the paint, maybe some stencils, and go to town.

I love the simple white approach, but there are a lot of cool ones for inspiration.


I have an old globe, I just need to sit down and do it!

I also think it would look great mixed in with a bunch of vintage globes like this:

But, then I'd have to find even more globes...


Tuesday
Apr122011

An Attempt at Upholstry

A couple of months ago I found a pair of chairs on Craigslist for $5.  We needed some extra seating in our living room, but don't have much space so the low profile of the chairs seemed perfect. Since the pair was so cheap,  I figured I could play around with upholstering them. (Or,  if it went really poorly, take them to a professional) Here are the results of the first chair:

Not bad for a first attempt, but I learned a lot.  I figured this was a pretty simple project as far as upholstry is concerned.  However, without the right tools,  I was pretty limited.  I couldn't quite  get the fabric cleanly into the frame with the standard staple gun that I had.  And,  the piping didn't totally cover up my work.  (Maybe I'll show some detail photos in a later post).  My mom helped with the pillow-cover so that piece looked great.  However, choosing to use stripes probably wasn't a good choice because that just added to the challenge.  

I'm still deciding what to do with the other chair.  Maybe use this as a learning experience, and see if I can do it better?  Or, maybe just hire an expert?  For now,  I'm happy with some new seating in our living room.