I've painted a variety of furniture pieces. From rustic shabby chic to glossy modern pieces, I've tried a lot of approaches. So, at a friend's request, I figured I'd share my "how to" with everyone.
I think the most important step in painting a piece of furniture is starting with a high-quality solid wood piece (no veneer or plastic). Here is the "before" of the antique buffet in my dining room: 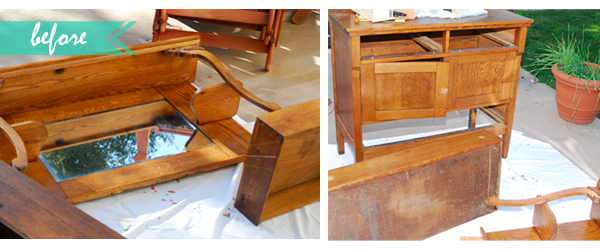
0 – Setup
Painting a piece of furniture can take a couple days. Make sure that you have an open, well ventilated place to both paint the piece and let it dry.
If your piece has any hardware take it off (I’ve tried just taping it and painting over but that never works. Also, if it has different pieces, take them apart. Take out drawers, take off legs etc. This will ensure that you don’t get weird, unpainted spots showing through later.
1 – Sanding
Check out the surface of the piece that you are planning to paint. The glossier or rougher it is, the more you will have to sand. If it’s a slick glossy surface you will need to sand it to make sure that the paint sticks. I usually start with a medium (100 grit) sandpaper and then smooth over with a finer grit (120-180 grit). What I found, is that the most important parts to sand are the large smooth areas. (like the top if you’re working on a table or a dresser) If you’re working on something with a lot of grooves or shape, no need to worry about crevices, they will naturally pick up the paint.
1.5 – Cleaning
Dirt and dust are your biggest enemies to a smooth paint job. Before you start painting or priming, make sure that your piece is totally clean. When sanding, cheesecloth (sticky gauze that you can pick up at any hardware or grocery store) is a great tool to have around because it picks up dust without getting the furniture wet. You don’t want to move on to step 2 or 3 until your pieces is clean and dry.
2 – Priming
This step also depends on the texture of what you’re painting, and how you are going to use it. I’ve painted a number of pieces without using primer, but for pieces that are going to get a lot of use, primer is an important step to avoid chipping. So, if that’s the case, coat your piece with primer. You can use a roller here to make it go quickly. This doesn’t have to look perfect, you just want a thin even cover. Once it has dried (time depends on the kind of primer you use) go on to step 3.
3 – Painting
Break out that paint. I’ve always used latex paint and usually the small (quart?) size is enough to cover a piece. If you want a modern look, gloss will give you a nice shiny finish. If you’re interested in a more worn in, shabby-chic result I’d suggest a semi-gloss or satin. (so that the finish is still wipe-able and stain resistant) Make sure that the paint is mixed thoroughly, and then use your choice of a paint brush, roller or sponge brush to apply the first, thin coat of paint. I usually prefer brushes, but the small foam rollers seem to provide the smoothest application if you’re worried about brush strokes. You’re going to need more than one coat of paint so make sure this coat is even and covers the entire surface of your piece. Look for drips and bubbles in this step, keeping a close eye on the corners and edges of the piece.
Wait for it to dry. Repeat.
I’ve found that it usually takes 3 thin coats to get the coverage and smoothness I want. Just make sure that the paint fully dries between each coat (otherwise you’ll get a sticky spotty mess)

“Antiquing”
With the (above) buffet in my dining room, plain white paint just didn’t look right – it needed a little bit more character. So, I used sanding and glaze to give it a worn in look.
Sanding: With your sandpaper, sand off some of the paint. You want this to look like the paint has been worn or rubbed off through natural wear and tear so think about where a piece would get rubbed and start sanding there. For example: corners, around door handles, etc. Also keep in mind that parts that are roughed up with sandpaper will also take more color from the glaze.
Extra credit: If you want your piece to look like it’s been painted a variety of colors over the years, you can actually layer on different colors that will then show through when you sand.
Glazing: In the decorative painting section, you can find a variety of glazes (mostly used for 80’s style faux painting techniques, but great for giving something an “old” look) In this case, I wanted my piece to be a bit warmer in color so I chose a yellowy-light brown color for my glaze. Once your final paint layer has dried, and you’ve sanded the piece you can apply glaze. Paint the glaze on (you will see brush lines) and then let it dry a minute or two. Then, use a dry cloth to wipe away some of the glaze and rub it in to certain areas. I suggest doing this in sections so you can pay attention to how each part will look. Just like dirt, let the glaze sit where dirt would naturally collect over time, in cervices and around corners. How much or little glaze you leave on the piece is up to you, so just do what feels right.
I hope this was helpful! If you're looking for inspiration, check out all the painted furniture on Etsy. Please let me know if you have questions.


 "Backpack to the Future " - ModCloth ($79.99)

 What do you think? Should backpacks be reserved for students and hiking?
 1 Comment


